185. Animating 3D characters
I have one annoying problem with anything I build in 3D – it’s very difficult to animate objects (which is why I initially stuck to vehicles like planes which don’t change their shape).
But I’d like to animate some of the characters in my 3D dungeon. I can cheat by wobbling them, or by using 2D pictures in some cases (as I showed recently for bats), but suppose I actually want to animate a character, eg move its arms or legs. What is involved?
A lot, as you will see.
How Blender does animation
This is my understanding of how Blender – a popular, free animation program – does animation.
You create the mesh outline of your 3D figure to start with (often with arms outstretched to the sides so all the limbs are away from each other).

You then add “bones” (or armatures, as Blender calls them) inside the mesh, chaining them together at their joints. Then you can add additional armatures to provide what is known as “inverse kinematics”, which simply means that you can push and pull parts of your figure around, and Blender will figure out how to move individual joints and bones, as well as the meshes outside of them. You don’t even need to break your mesh into separate body parts, because Blender will figure out the influence of each armature on each vertex.

Once you know how to do this “rigging” process, it is an effective way of animating characters, as you can see here.
How Codea does animation
Unfortunately, in Codea, we don’t have any of these animation tools. We have meshes, and that is all. I’m not complaining, because Codea is amazing, but this is going to be hard – really hard.
A basic approach
If I want to animate a character, I’m going to have to break the mesh into separate body parts, so each can move independently.
I can use “bones” to position each of the body parts, because bones have a fixed length, and if I know the position of the joints at each end, I can figure out which direction the bone is pointing, and orient the mesh correctly.
And bones are attached to each other by joints.
So I can animate the character by moving the joints through a series of positions, which will automatically decide the position and direction of all the bones (because each bone is attached to a joint at each end), and the meshes attached to them.
This is what is involved in drawing one frame.
- Translate to the position where I want to draw the character
- Rotate the character if I need to
Then for each bone inside my character, with joints at positions j1 and j2
- translate to the centre of the bone =(j1+j2)/2
- figure out the direction the bone is pointing =(j1-j2)
- subtract the starting direction of the bone, so we know how much we need to rotate the mesh from its original position
- rotate by this amount
- draw the mesh
This may not sound terribly difficult, but figuring out the rotations has kept me busy for a few days. If the bone rotations were just left and right, that would be easy, but they could be in any direction, and require rotations on more than one axis.
There are formulae for getting these rotations from a direction vector, but there are nasty things like gimbal lock that you have to watch for.
So it’s much better to use quaternions, which avoid these problems but are horrendously complex to work with, unless you can find someone else to write the functions you need. I spent three (3) days getting my quaternion functions to work, for reasons I won’t bore you with. I could have used the library created by our resident mathematician, which is included in my flying code here, but it would have taken me even longer to figure out how it works and how to use it.
To test my results, I simply created a 3D “stick” for each bone, with the right length, so all I had to do was position it and rotate it correctly to create a stick figure. The meshes can come later.
This is the result (the head is just one very fat stick).
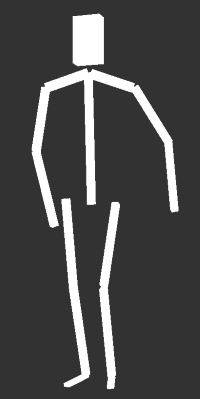
I have 14 separate bones and 17 joints.
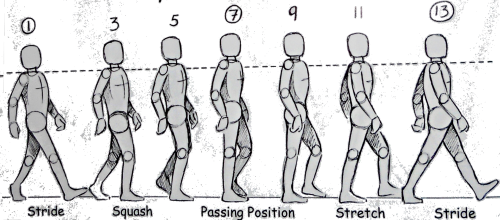
When I want to make this figure walk, I need to provide some extra “frames” with different body positions, and by showing them one after the other, it gives the illusion of walking. Animators call this a walk cycle.
I can see a number of problems right away.
- I have to provide 17 x,y,z joint positions for each frame, and
- they all need to be kept accurate relative to each other, and
- some body parts (like the trunk) may need to rotate
- body parts may not fit together properly when they rotate
- how will I store all these positions
- will it run fast enough
Let me give an example of the second point. When you walk, you move up and down as your legs bend and straighten. If I want to bend the legs, I need to push the knees forward, and reduce the height of the hips (and everything above the hips). This height reduction must be realistic and depend on how bent the legs are. This is what the inverse kinematics in Blender do for you, but we don’t have that, so I will have to tune my positions manually.
What I mean by the third point is that something like the body is wide, and when walking, one side twists forward, then backward. At the same time, the body may be leaning forward or backward. One bone can’t manage all that.
I read some funny stories of how game developers have dealt with the fourth problem over the years. The simplest option seems to be to make the shoulder, hip and knee joints bulky, eg with armor padding, so you don’t see the actual join. I will have to cut the model to pieces in Blender (once I am working with meshes) and try to overlap the pieces so I don’t get gaps between them.
I also need to think about how I can store all the joint positions efficiently, because there are going to be many of them. And if I want to program other movements like running or jumping, then that’s a whole new set of positions. Then if I want to fire a weapon while walking/running/jumping – well, you get the picture. There’s a funny story about that, too. Apparently in the original Quake, they didn’t want to have to program all the different combinations of movement and action (like firing a weapon), so they only programmed firing with the standing still animation. This meant that if the monster fired while coming toward you, it looked like it was skating with its legs together. Then in Quake 3, they apparently split their animations into the top half and bottom half of the monsters, so they could mix and match. They used loose “clothing” to cover up the joins.
Why bother?
Of course, there is a real question over whether I really need to do this, because if my dungeon monsters always face me, I could use a series of 2D images (“billboards”) to create a convincing animation.
But let’s just say that I know how to do that already, so it isn’t interesting. Animating a 3D figure is much more interesting, even if I can’t see how to do it effectively at this stage.
Maybe I’ll start by building my own movement editor that will make it easier to set all the bone positions.

Trackbacks & Pingbacks