187. Moving and shooting using modelMatrix
I’d like to share a nice trick for moving around or shooting, in 2D or 3D, using the model matrix (modelMatrix in Codea).
First, the model matrix is a 4×4 matrix used to scale, translate and rotate objects. I’ve explained it here (but you don’t have to read that first).
2D
Let’s start in 2D.
Suppose your starting position – before any rotation – is pointing up the screen, ie vertical. You turn left at an angle of 45 degrees using rotate(45). You then want to move 10 pixels forward. What is your new position?
You can calculate it easily using the model matrix, because it has been created specifically for this kind of calculation
- If you hadn’t rotated, you would move 10 pixels up the screen, ie current position + vec2(0,10).
- If we apply the model matrix modelMatrix() to vec2(0,10), it rotates it by 45 degrees
- We add the result to the current position, to get the new position
So your code might look something like this. Note that I’ve separated the velocity of vec2(0,10) into two parts,
- direction of vec2(0,1) and
- speed (currently 10),
to make it easy to vary the speed later.
translate(pos.x, pos.y) --move to current position
rotate(45)  -- rotate to current angle
sprite(spaceship,0,0) --draw vehicle
--calculate position for next time
speed = 10
velocity = vec2(0,1) * speed --velocity = direction x speed
pos = pos + modelMatrix() * velocity
How does this work?
The model matrix has a fancy name, but all it does is resize, translate (ie move) and rotate your objects for you. Actually, that’s quite impressive for a little 4×4 matrix!
We’re looking at rotation in this post, and for 2D, that is handled in the top left 2 x 2 corner of the matrix. Let’s see what happens when we rotate by 45 degrees.
The (top left corner of) the model matrix changes like this
( 1   0 ..  ====>  (  0.71 0.71 ..
( 0   1 ..  ====>  ( -0.71 0.71 ..
The first row handles changes to the x value of any point, and the second row handles changes to y.
So let’s see how it works. Below is a picture of how we would expect two points on the x and y axes to change when rotated left 45 degrees.
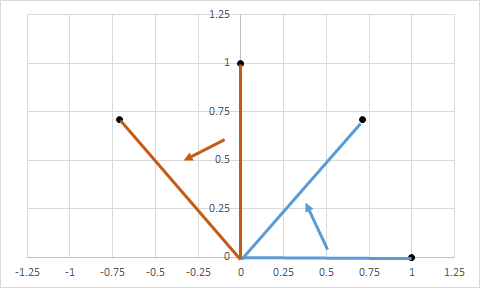
The blue point starts at (1,0) on the x axis, and when rotated, it is at (0.71, 0.71). Guess what you get when you multiply 1 by the first row of the model matrix? (The second row doesn’t matter because it is multiplied by a y value of 0).
Similarly, the brown point starts at (0,1) on the y axis. When rotated, it is at (-0.71, 0.71). This is also what you get when you multiply 1 by the second row of the model matrix. (In this case, the first row gives zero because the x value is 0).
So multiplying any point by the model matrix gives us the new position after rotating left 45 degrees. And we can use that to figure out where we will be, after moving 10 pixels in our rotated direction.
We also know that when calculating how far we move, we only need to use the second row of the model matrix, because our velocity of (0,10) only has a y value. So our code can simplify to a couple of simple multiplications
pos = pos + vec2(modelMatrix()[5],modelMatrix()[6]) * speed
Note that
- modelMatrix always has double brackets next to it because it is not an ordinary matrix,
- however we can pull items out of it as though it were a table
- the items in the matrix are numbered from left to right, so the first row is numbered 1 to 4, the second row 5-8 and so on
Shooting and hitting a target
Now we can try something more ambitious.
Suppose we also want to shoot at something on the screen. How do we know if we hit it?
The obvious method is to create a line for the path of the bullet, heading forward from your position, and calculate where the target is closest to this line, which tells you how close you got. There are various formulae for this depending on whether you describe your line with an angle, two points, etc.
But I’m not going to bother with any of that.
We already know how to move straight ahead using the model matrix. So suppose we do this
- calculate the distance to our target, let’s call it d pixels
- using modelMatrix(), calculate the point d pixels in front of us
- calculate the distance from that point to the target
So what I’m doing is figuring out where the bullet would land if it travelled exactly d pixels. This is not quite as accurate as using trigonometry, but plenty good enough for games.
The code might look something like this
translate(pos.x, pos.y) --move to current position
rotate(45)  -- rotate to current angle
sprite(spaceship,0,0) --draw vehicle
if shooting then
    d = pos:dist(targetPos)
    hitPoint = pos + vec2(modelMatrix()[5],modelMatrix()[6]) * d
    if hitPoint:dist(targetPos) < someValue then
        --we hit it!
    end
end
Adding randomness
This approach makes it easy to wobble the aim a little, to make things interesting. If you were doing all this with angles, you might add a small random amount to the shooting angle. However, we know that the error from an incorrect angle is linear with distance, ie it is twice as much when you are twice as far away. So if you want to add some random error, then you can simply add a small random value to the hitPoint calculation, and multiply it by the distance to the target.
Shooting at a different angle
Suppose you have a spaceship with lasers all around it. They will shoot in different directions, rather than straight ahead. How do we deal with that?
It’s actually quite simple. First, you take the spaceship before it is rotated, and calculate a vector (x,y) which tells you the direction the laser is pointing.
Suppose it is vec2(-1, 2.5), which tells you that the laser travels up 2.5 pixels for each pixel it travels to the left. At this stage, it doesn’t matter what the numbers are, as long as the ratio between x and y is correct.
This vector contains direction and speed. We need to get rid of the speed part (by making the length of the vector=1), because we will add speed later. The easiest way to do this is to normalise the vector with normalize(), perhaps like this
laser[1].direction=vec2(-1, 2.5):normalize()
Now, when you want to calculate where the laser hits, you need to calculate the x and y results by applying modelMatrix to the direction vector and multiplying by the distance to the target.
if laser[1].shooting then
   d = pos:dist(targetPos)
   hitPoint = pos + modelMatrix() * laser[1].direction * d
   if hitPoint:dist(targetPos) < someValue then
       --we hit it!
   end
end
This will rotate the laser from its original direction, by whatever angle the spaceship is at.
3D
The nice part is that this same approach works just as well in 3D, with very little modification. Instead of messing around with 3D angles and geometry, you can use almost exactly the same formulae as in 2D!
The only change I’ve made below is that in 3D, you usually start off facing forward into -z, so the initial direction is vec3(0, 0, -1).
translate(pos.x, pos.y, pos.z) --move to current position
-- do your rotations here, whichever way you want, and then...
spaceship:draw() --draw vehicle mesh
if shootingForward then --shoot straight ahead
    d = pos:dist(targetPos)
    hitPoint = pos + modelMatrix() * vec3(0, 0, -1) * d
    if hitPoint:dist(targetPos) < someValue then
        --we hit it!
    end
end
if laser[1].shooting then --shoots at an angle
   d = pos:dist(targetPos)
   hitPoint = pos + modelMatrix() * laser[1].direction * d
   if hitPoint:dist(targetPos) < someValue then
       --we hit it!
   end
end
--calculate position for next time
speed = 10
--direction is toward -z, before rotation
velocity = vec2(0, 0, -1) * speed
pos = pos + modelMatrix() * velocity
