198. Looking at objects in 3D
If you have an object at one point, how do you rotate it to face another point?
OpenGL has a special “look at” command, but we don’t have that in Codea.
However, we can write one using cross products. The problem is understanding it, even though it’s only 5 lines long.
This post explains how it works (and it’s a neat use of cross products, too).
First, you won’t understand this post unless you’ve read the previous posts on vectors and cross products.
This is the function
function LookAtMatrix(source,target,up)
    local Z=(source-target):normalize()
    up=up or vec3(0,1,0)
    local X=(up:cross(Z)):normalize()
    local Y=(Z:cross(X)):normalize()
    return matrix(X.x,X.y,X.z,0,Y.x,Y.y,Y.z,0,Z.x,Z.y,Z.z,0,
                  source.x,source.y,source.z,1)
end
Let’s pick it apart.
You give it
- a source vec3 – where your object is – and
- a target vec3 – what you want to look at
- (optionally), an up vec3 (but ignore it for now)
The function gives you back a matrix, and if you use it for drawing your object, it will rotate it to face the target, as in the example below.
local m=LookAtMatrix(objectPos, targetPos)
modelMatrix(m) --tell Codea to use m for drawing
object:draw() --draw the object, rotated to face the target
Let’s look at what is happening in the function. Three variables X, Y and Z are calculated, and put into a matrix that is returned. It’s the calculation of those variables that we need to understand.
I always find it easier to understand if I can visualise it, so imagine you are standing facing forward with your arms outstretched to the sides.
- the y axis runs vertically up your body
- the x axis runs sideways through your arms from left to right
- you are standing on a line, the z axis, that runs forward into -z
- the target is a red star, up and to the right.
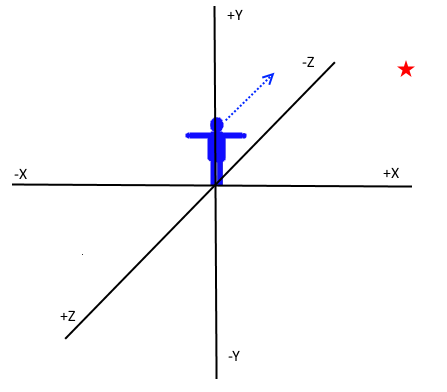
We start with the z axis, by pointing it directly at the target object. It is a direction, so it needs to be normalised (as discussed in a couple of recent posts).
local Z=(source-target):normalize()
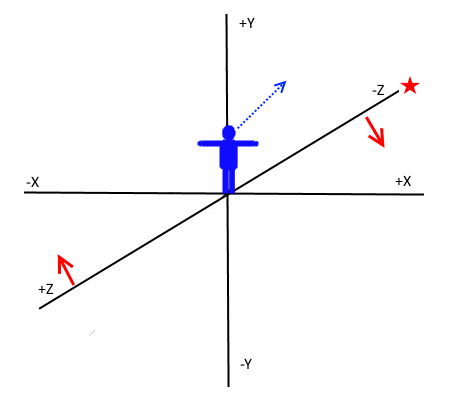
Next, we turn the x axis. so it is at a right angle to z, and we are facing the target.
You would expect this to be the answer.
But how about this? The x axis is still at right angles to z, so it is a valid alternative.

In fact, the x axis could be at any angle around the z axis, even leaving us upside down. How do we decide between them?
The answer is that our scene has an “up” direction defined by the camera settings, which defaults to (0,1,0), or vertical. Our x axis should be at right angles to this direction. You can see this if you think of the up direction as being a line that runs up from your feet to your head. It is at right angles to the line through your arms.
So x needs to be at right angles not just to the new z, but also to the up direction. And guess what – the cross product does just that, giving you the direction that is at right angles to two other direction vectors.
And that gives us these lines, which should explain why we have an up parameter.
up=up or vec3(0,1,0)
local X=(up:cross(Z)):normalize()
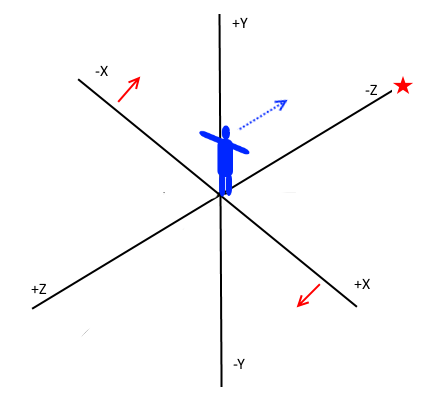
There is just one axis left, y, because our body, having been turned, needs to be tilted back so we can look up to the target.
This axis needs to be at right angles to x and z, so the cross product does the job again.
local Y=(Z:cross(X)):normalize()
Note the order – you would not get the right answer with X:cross(Z). Always go in the sequence X, Y, Z, then X again.
Now all we need to do is put X, Y and Z in the first three rows of the matrix, and the source position in the bottom row, and pass the matrix back. I’ve explained this matrix here.
There is just one puzzle I spent a while figuring out. If we use the up vector as a substitute for the y axis, to calculate the x axis, why do we need to then calculate y from x and z immediately afterwards? Isn’t the y axis the up vector?
The answer is that when we use the up vector and z to calculate x, we’re not finished, because the up vector (looking vertically straight up) isn’t at right angles to z, which is pointing upward at an angle in our example. We need to tilt it backwards, keeping it at right angles to x while we do that. And that’s what we are doing when we calculate y.
Trying out the code
The code at the bottom shows three figures on a line in the distance. The camera runs left and right in front of them, and as it gets to the sides, you can see the figures are just 2D pictures. Except that the middle picture turns to face the camera, using our LookAt function.
You’ll also notice that the middle picture is back to front. This is because when we draw an image in 3D, the default direction is facing forwards into -z. So when we rotate the picture to face the camera, ie backwards, it reverses the image too. If you want to prevent this, you can flip the x axis of the image so it reverses again, by making it negative.
--change this (which draws the image with width of 20 pixels)
sprite(img,0,0,20)
--to this
sprite(img,0,0,-20,33)
--(you need to put the y value in too, otherwise Codea
--will assume it is the same as x, and flip upside down!)
Here is the code for the video above.
function setup()
    img=readImage("Planet Cute:Character Horn Girl")
    camPos=vec3(-200,5,125)
    --animate camera
    tween(10,camPos,{x =200},{easing = tween.easing.linear,
                              loop = tween.loop.pingpong } )
end

function draw()
    background(0)
    perspective()
    camera(camPos.x,camPos.y,camPos.z,0,0,0)
    --draw line behind figures
    pushMatrix()
    strokeWidth(1)
    stroke(255)
    translate(0,-10,-5)
    line(-50,0,50,0)
    popMatrix()
    --draw figures that don't rotate
    sprite(img,-25,0,20)
    sprite(img,25,0,20)
    --rotate and draw central figure
    local m=LookAtMatrix(vec3(0,0,0),camPos)
    modelMatrix(m)
    sprite(img,0,0,20)
end

function LookAtMatrix(source,target,up)
    local Z=(source-target):normalize()
    up=up or vec3(0,1,0)
    local X=(up:cross(Z)):normalize()
    local Y=(Z:cross(X)):normalize()
    return matrix(X.x,X.y,X.z,0,Y.x,Y.y,Y.z,0,Z.x,Z.y,Z.z,0,
                  source.x,source.y,source.z,1)
end

super usefull for oldscool 3d dungeons. thanks)